If you’re looking for a delicious, crowd-pleasing dessert, then you’ve just found it. Summertime desserts should be easy, feed many and be pretty quick to pull together. Other than the fruit, these ingredients are mostly pantry staples, that take no time to measure out and assemble. So, please don’t be deterred by the list of ingredients and give it a try.
First, regarding the fruit, you can do innumerable combinations of your favorites. Here, I have used blueberries, peaches and nectarines. However, if you look closely at the pictures, I also threw in a few strawberries that I had. So, a great way to use up some random, leftover items. The one thing I would caution against, is just using one fruit…a combination of two or more is definitely preferred and is just more flavorful.
Additionally, feel free to mix up the amounts of each fruit to your preference or availability. If you like, try just blueberries and nectarines, a terrific combo and the nectarines don’t have to be peeled. So, that’s a big plus in my world. Additionally, add in some raspberries or mango, either would be wonderful. Finally, just don’t be afraid to be creative or practical with this.
INGREDIENTS 24 oz. blueberries 2 peaches, peeled and sliced 2 nectarines, sliced 2/3 cup sugar 2 1/2 Tbs. cornstarch 3 Tbs. lemon juice 1/8 tsp. kosher salt
TOPPING INGREDIENTS 1 cup flour 1/4 cup sugar 2 Tbs. cornstarch 1/2 tsp. baking powder 1/8 tsp. kosher salt 6 Tbs. cold butter, diced 1/2 cup half and half 1/3 cup sliced almonds 3 Tbs. turbinado sugar (raw sugar) 1 Tbs. egg white
DIRECTIONS Preheat oven to 350º Combine fruit in a 13×9 baking dish coated with cooking spray. Mix the 2/3 cup sugar, 2 1/2 Tbs. cornstarch, lemon juice and 1/8 tsp. kosher salt and then, sprinkle over the fruit and gently toss to combine.
oven-ready
For the topping, combine the flour, 1/4 cup of sugar, 2 Tbs. cornstarch, baking powder and 1/8 teaspoon of salt and stir to combine well. Cut the butter into the flour mixture until the mixture looks like coarse cornmeal. Then, add the half and half, gently mix with a fork, just until combined and moist. Next, drop by spoonfuls, evenly over the fruit mixture.
Finally, for the topping, combine the almonds, turbinado sugar and egg white. Toss to mix well and evenly sprinkle over the top and bake for about 50 minutes or until the topping is nicely browned. Serve with vanilla ice cream. This makes enough for about 10 people.
Jordan Marsh’s Blueberry Muffins
For New Englanders, most need no introduction to this recipe. To those that don’t know, Jordan Marsh was a large department store based in downtown Boston. They had a wonderful in-store bakery and though the bakery had many wonderful items, their blueberry muffins were what made them famous. These treats are overflowing with blueberries and have a yummy, sugar crusted top that makes them absolutely irresistible. Although the Boston store closed in the mid 1990’s, this recipe lives on and is still an all time favorite. Give it a try, I promise it will not disappoint.
INGREDIENTS 1/2 cup butter, room temperature 1 cup sugar 2 eggs 1-1/2 tsp vanilla extract 2 cups flour 1/2 tsp salt 2 tsp baking powder 1/2 cup milk 2-1/2 cups blueberries 2 Tbs raw sugar (for the top of muffins)
DIRECTIONS Preheat oven to 375º.
First, cream the butter and sugar until they are light and fluffy; add the eggs, one at time, beating well after each. Then, add the vanilla and mix to incorporate. In a separate bowl, combine the dry ingredients (flour, salt, baking powder), then add to the mixture, alternating with the milk. Do not overmix.
Crush 1/2 cup of the blueberries with a fork, add to the batter, stir to combine and then fold in the remaining whole berries.
Next, spray a 12 cup muffin pan with non-stick spray and I also recommend using paper muffin liners. Because of the volume of blueberries, they definitely tend to stick to the pan and the paper liners just make things easier. Fill the liners with the batter and take note that they will almost be overflowing. Finally, sprinkle the 2 tablespoons of raw sugar over the tops. The combination of the very full muffin liners and the additional sugar on top makes a wonderful, crunchy topped muffin when they overflow a bit (and they will). Trust me, that overflowing batter, with the crispy sugar, without a doubt is my favorite part of the muffin, it will become your favorite as well.
Bake at 375º for about 30-35 minutes. Cool in the pan. After several minutes of cooling, run a knife around the edge of each muffin to release it from the pan and then cool on a wire rack for about 30 minutes…if you can wait that long!
NOTES If you don’t have raw sugar or turbinado sugar, you definitely can use regular granulated with good results. This will seem like too much batter for only 12 muffins, but stick to the 12 muffins, because part of the yumminess is the overflowing, crunchy top. Also, when storing the muffins, do not cover them or they will be too soggy the next day.
Pulled Pork Perfection
This is a dangerous dish to have around. Between the intoxicating aroma filling the house and the mouthwatering flavor, this is a tough one to stop eating. Yes, I think I may have a problem, but this is so delicious! Although this takes about 4-5 hours (depending on the size and your oven) and may seem overwhelming, it is actually quite simple. So few ingredients, very little tending or fussing and the oven does all the work.
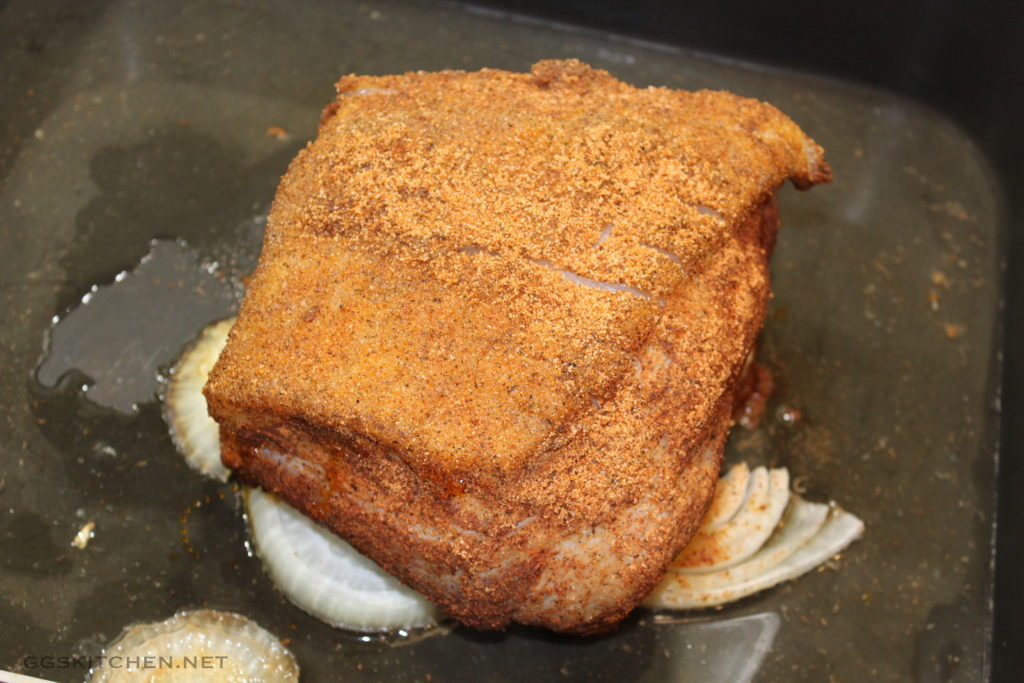
INGREDIENTS 3-5 lb. boneless pork shoulder (sometimes called Boston Butt) 1-2 large sweet onions, thickly sliced 1/2 cup spice rub, I use Bad Byron’s Butt Rub or my homemade rub 2/3 cup apple cider vinegar
DIRECTIONS The night before or early on the day of cooking, prepare the roast. First, if your pork shoulder has one side with a heavy layer of fat, you want to score that before cooking. Just make shallow cuts, first in one direction and then again in the opposite direction, forming a diamond pattern. No need to be fuzzy here, you are just allowing the fat to render out, without curling the meat. Next, sprinkle the spice rub on all sides of the pork, using your hands to rub it in and coat it completely with the rub. It will seem like a lot, but that’s okay, it should be, it needs to be quite heavily coated. Place the roast on a large plate and cover it with plastic wrap and refrigerate, hopefully for a solid 3-4 hours, preferably overnight.
Preheat the oven to 300º Remove the roast from the refrigerator about 30 minutes before cooking. Put the onions in your roasting pan, in one close layer. This will be the “bed” that the roast sits on and it adds great flavor to the pan juices. Place the roast on top of the onions and pour the cider vinegar into the pan around the onions. Cook the pork for 4 – 5 hours or until it shreds easily with a fork. After the first hour, baste the roast with the pan juices. If the pan juices dry up, add a small amount of water, to ensure the onions don’t burn. Continue to baste, about once an hour.
When the meat is cooked, use two forks, pulling apart the meat and shredding it into bite-sized pieces, discard any large pieces of fat and add some of the pan juices, to keep it moist until serving.
NOTES Serve the pulled pork with buns of your choice, a drizzle of pan juices, and some Lime Cilantro Slaw. If you’re feeling energetic, you could try these, no-fail, delicious buns from King Arthur’s website. You won’t be disappointed! Alternatively, I have added potatoes, carrots and parsnips to the pan and served it more as a roast. That is a great cold weather, comfort food meal, that also never disappoints.
Ginger Molasses Cookies
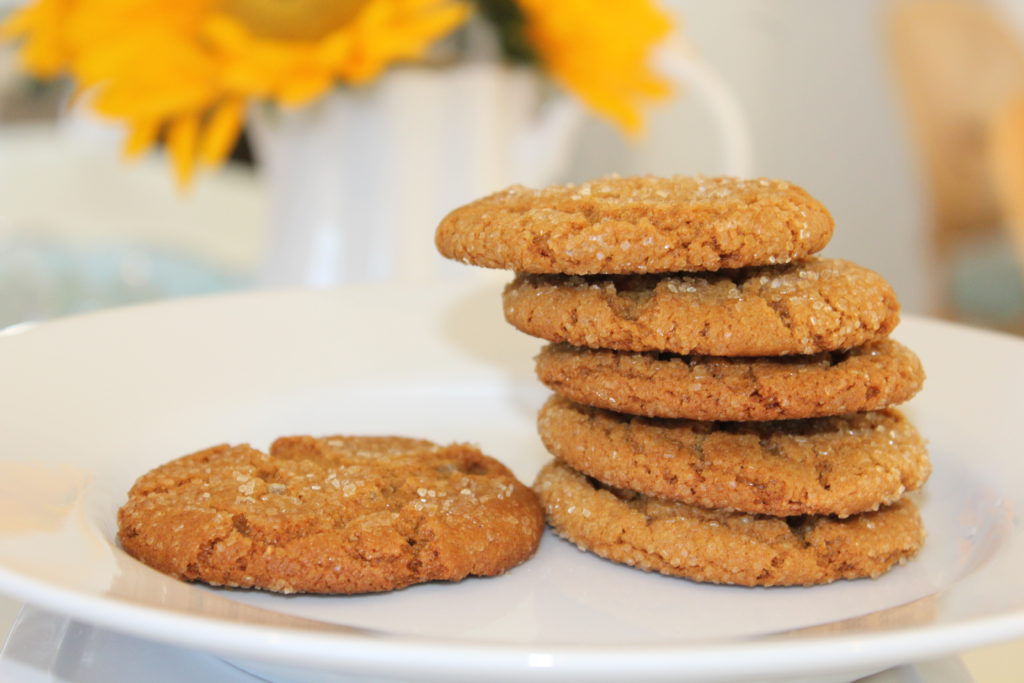
This is the quintessential cookie that signifies fall is in full swing and the holidays are soon to follow. This is one of my all-time favorites. It’s tough to stop at one. It just makes a cup of coffee taste that much better. Easy, reliable, and oh so satisfying.
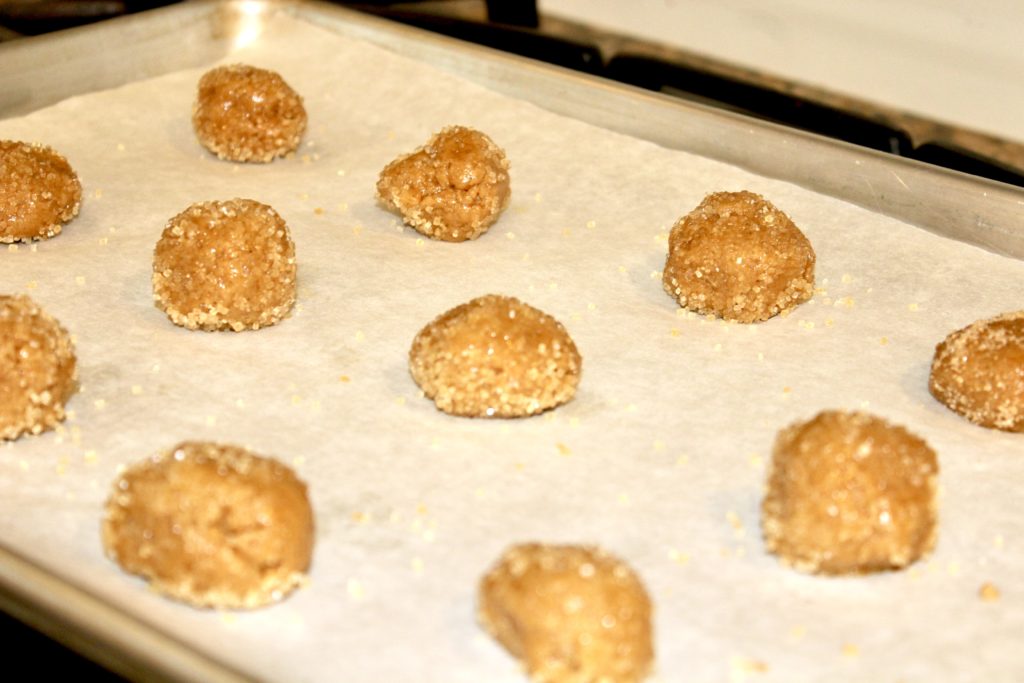
INGREDIENTS 3/4 cup shortening (145g), I use Crisco 1 cup sugar 1 egg 1/4 cup molasses (85g) 2 cups flour 1 tsp. each cinnamon, ginger, ground cloves 2 tsp. baking soda 15g crystalized ginger, finely chopped, optional turbinado raw cane sugar, for rolling
DIRECTIONS Preheat oven 375º First, cream the shortening, sugar, egg, and molasses, until well combined and fluffy. Meanwhile, combine the dry ingredients and whisk them together. Next, add the dry ingredients to the sugar mixture and fully incorporate. Finally, take a small scoop of dough and roll it into a ball. Dip and roll it in the turbinado sugar to fully coat. Bake on an ungreased cookie sheet for about 10 minutes. Do keep a close eye on them, all ovens are different and that could affect the timing on these.
oven-ready
NOTES If you don’t have turbinado sugar, not to worry, you can use regular sugar with similar results. The turbinado sugar just adds a little extra crunch that is a nice addition. To add more zip to the cookies, I chop some crystallized ginger. Then, I add it to the batter.
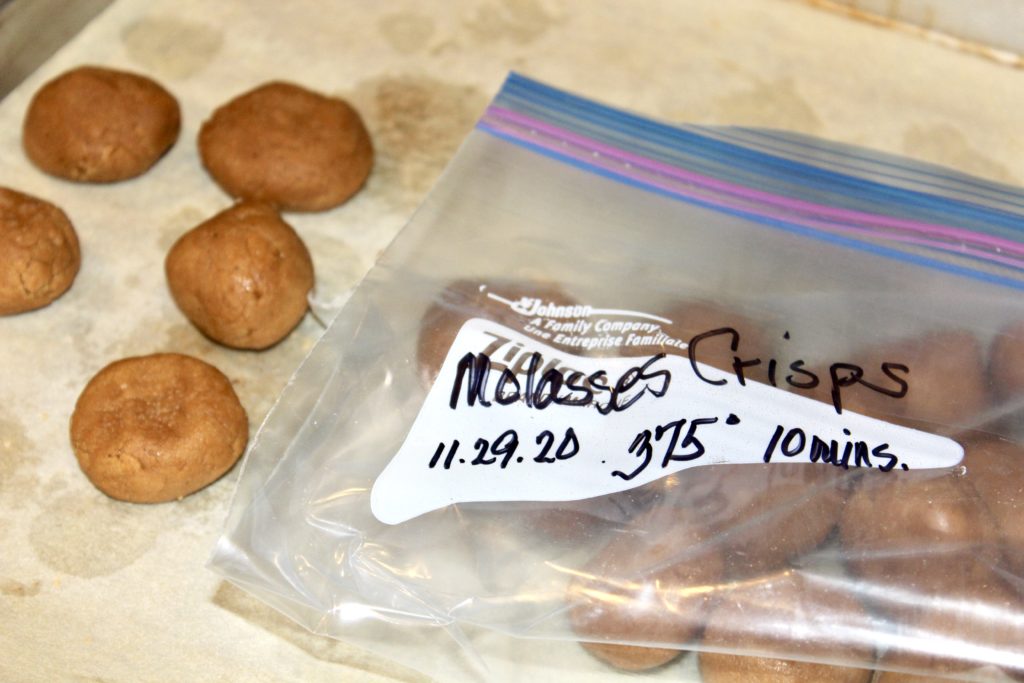
TIPS Although many of you may already do this, I want to share this secret anyway. For all of you that have not tried this, I think it is a definite game-changer. This little trick comes in very handy when I’m baking with the little ones and I don’t want three dozen cookies in the house because, truth be told, I can’t stop eating them!
frozen dough ballsfreezer-ready
So, here it is. I make the cookie batter, cook what I want…maybe just one full sheet pan, for a small get together or just enough for me and my helpers. Then, I scoop the rest of the dough, make dough balls and place them onto a sheet pan. Put as many on the pan as you can fit, then pop them into the freezer.
Then, after about 30 minutes in the freezer, pull them out. Remove them from the sheet pan. Place them in a plastic bag. Make sure to mark the cookie name, cooking instructions, and the date. You can pull them out at a moment’s notice. You don’t even need to thaw them first. Bake as many as you want. I do this with all of my cookie batters. Additionally, it is nice to have a choice of two or three kinds in the freezer.
Macaroni and Cheese
Well, the temperature is dropping, the world is imploding and I don’t know about you, but I want some mac and cheese. Make that bacon mac and cheese! This is serious comfort food and I promise, it won’t disappoint. Now, it definitely won’t fix this crazy world, but it will make you feel just a little bit better.
INGREDIENTS 2 oz. smoked bacon 8 Tbs. butter, separated 6 Tbs. flour 2 tsp. kosher salt 1 tsp. fresh ground pepper 1 tsp. dry mustard 1/2 tsp. nutmeg 4 cups milk, warmed 7 oz. gruyere cheese, shredded 7 oz. sharp cheddar cheese, shredded 4 oz. fontina cheese, shredded 1 lb. macaroni of choice (I prefer cavatappi) 2-3 small tomatoes, sliced 1 cup panko crumbs small handful of fresh parsley, finely chopped
DIRECTIONS First, let me say that the cheese amounts and kinds of cheese are definitely flexible. Use what you have on hand. If you have more of one cheese than another, use it and don’t fuss over it. Everything will be fine and more importantly, it will be delicious. Additionally, the bacon is optional, however, if you do use it, I highly recommend a thick-cut. If using the thick-cut, you would use 2 slices.
Now, time to make the white sauce. Start by cooking the bacon, until crisp, then remove to a plate with paper towels, to drain. Set the bacon aside and once cooled, chop or crumble. If there is an abundance of bacon fat, do pour that off, you only need a small coating left in the pan. Then, using that same pan, over medium heat, melt 6 tablespoons of the butter and add the flour. Continuously stir for two to three minutes or until the flour turns a light golden brown. Then, add the salt, pepper, mustard, and nutmeg, continue stirring and cook for another minute.
Next, slowly add the warmed milk, while constantly whisking to prevent lumps from forming. Slow and steady is the way to go with this sauce. It doesn’t take long, but it does need attention, constant stirring for a few minutes to let the milk be incorporated and warm the mixture enough to start thickening. Then, add the cheese and do the same for a few minutes to allow the cheese to melt. It doesn’t need to fully melt, it will finish in the oven. Meanwhile, cook the pasta according to the directions, however just slightly undercook it. Have no fear, it will finish cooking in the oven.
Drain the pasta, add it to the sauce and add the bacon as well. Stir to combine well and then pour into a large, ovenproof casserole dish. Now, melt the last two tablespoons of butter, add to the panko crumbs, along with the parsley, a hefty pinch kosher salt, some fresh ground pepper and stir to fully combine. Then, slice the tomatoes and place them in an overlapping row down the middle of the casserole. Finally, sprinkle the crumb mixture over the tomatoes and macaroni. Bake in the oven for about 35-40 minutes or until bubbly and the crumbs are golden brown.
NOTES Alternatively, you could use individual gratin dishes instead of a large casserole, as in my picture above. This is a nice presentation, especially if you’re making it for company. Although the tomatoes are a yummy touch, omit them if you wish. Also, feel free to omit the bacon if it feels too rich. However, I do think you should try it with the bacon and the tomatoes at least once!
Foolproof Apple Tarts
Fall is my favorite season, here in New England, and beautiful days, cooler nights are a sure sign that fall has arrived. This is about the time I shift to more cozy, heartwarming comfort foods. And, it wouldn’t be fall without apples on the menu. Although I have a soft spot for apple pie and who doesn’t? I love the simplicity and no-fail aspect of these tarts. They are a wonderfully satisfying dessert that requires very little time and effort. That’s a definite win, win for me.
INGREDIENTS 1 package frozen puff pastry (I use Pepperidge Farm) 4 Granny Smith apples 1/4 to 1/3 cup sugar 4 tablespoons (1/2 stick) cold unsalted butter, diced 1/4 cup apricot jelly or jam 1 Tbs. water or Calvados, if you have it
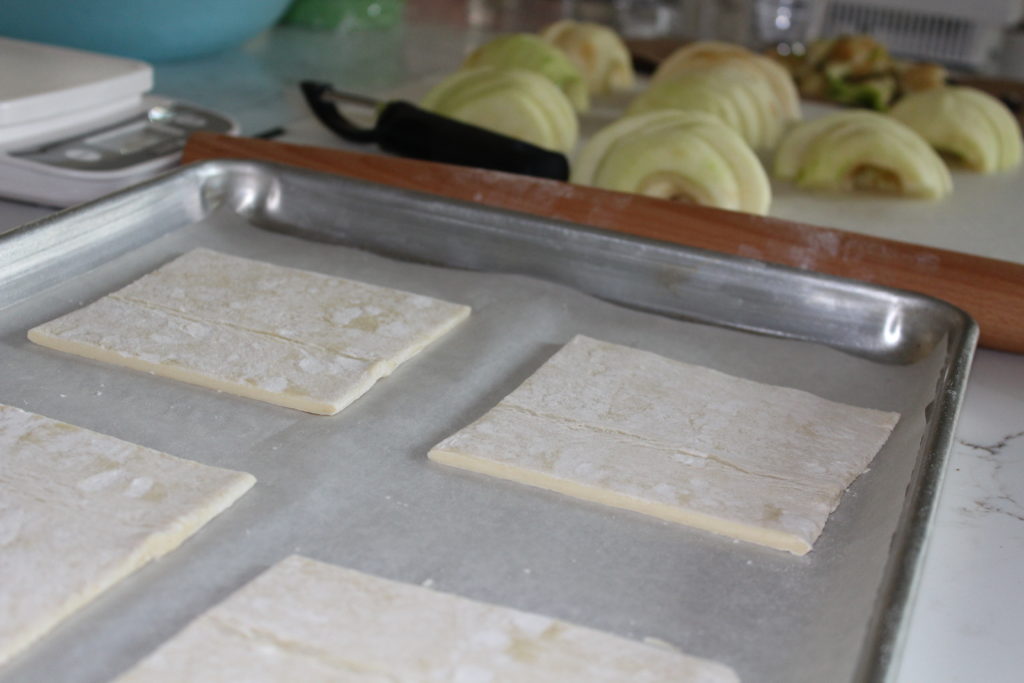
DIRECTIONS Preheat oven to 400º. First, thaw the puff pastry, unfold and then place each sheet on a parchment-lined sheet pan. Then, cut each of the two sheets, into four squares.
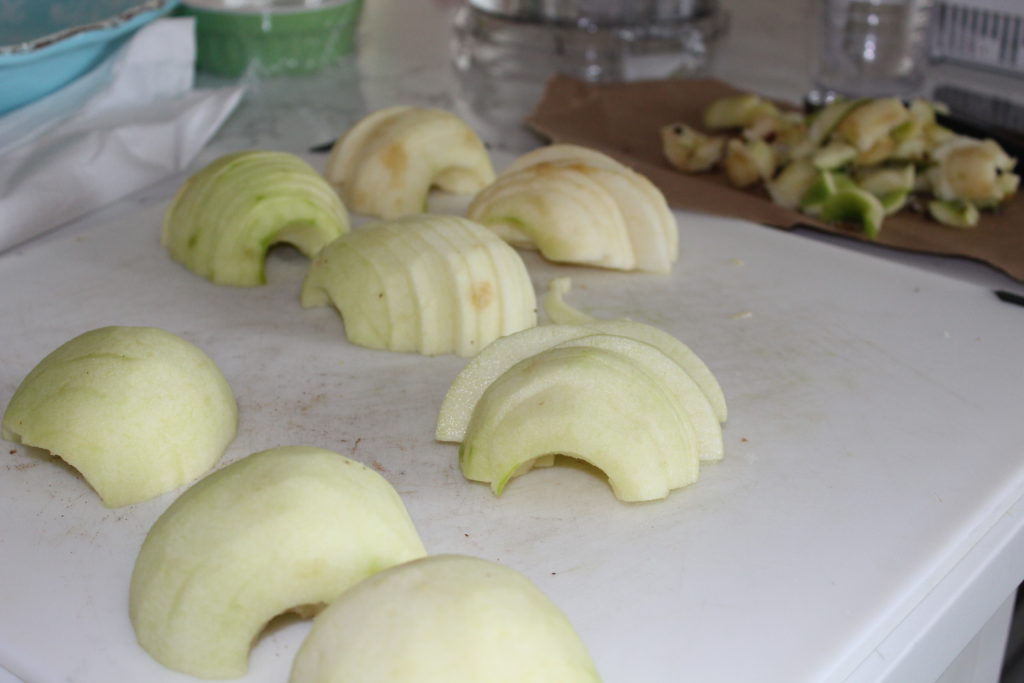
Next, peel and core the apples, cut them in half through the cut-away, core area, and slice them crosswise into ¼-inch slices. Then, place overlapping slices of apples diagonally down the middle of the tart and fill in with smaller pieces on the sides, until the pastry is covered. Finally, sprinkle with the sugar and dot with the butter.
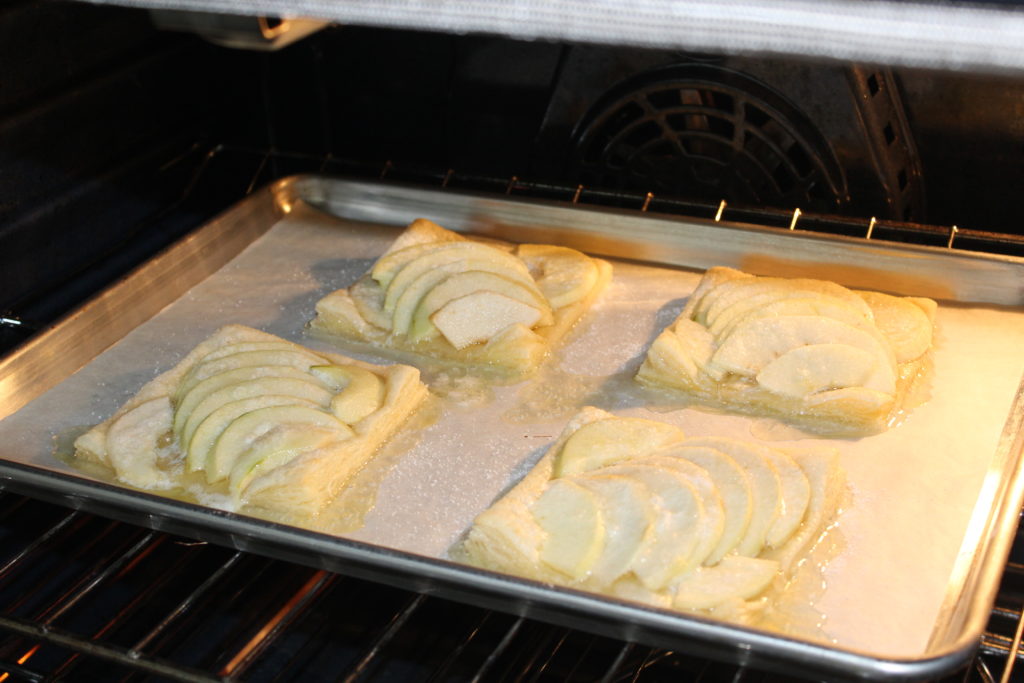
Bake for 40 to 45 minutes. You will know they’re done when the pastry is browned and the apple edges are lightly browned. Rotate the pan once during cooking. Don’t panic when the apple juices burn in the pan (they always do), the tart will be fine!
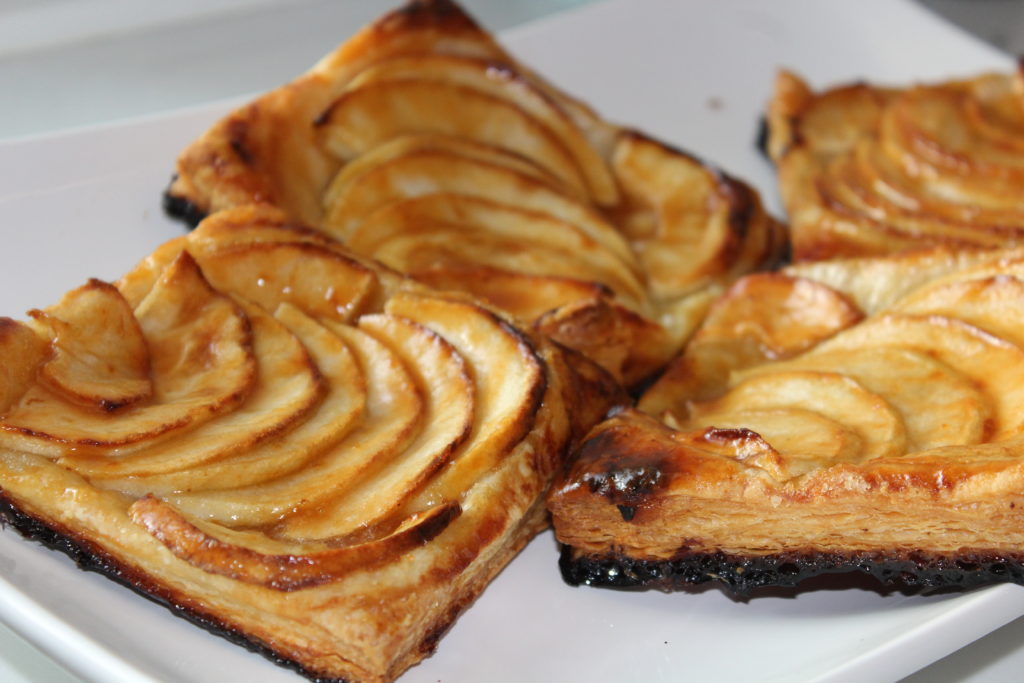
Meanwhile, combine the apricot jelly and water in a small microwaveable bowl and heat until bubbly. Then, brush the apples and the pastry completely with the jelly mixture. Loosen the tarts with a metal spatula so they don’t stick to the parchment and allow to cool. Serve warm or at room temperature.
NOTES A nice addition to these would be toasted, slivered almonds sprinkled on top. Another would be adding a pinch of cinnamon to the sugar, before sprinkling on top. Additionally, you might want a scoop of vanilla ice cream when serving them hot from the oven!
Sourdough Bread
Who will ever forget the winter of 2020?! It was a horrible one, by any standard. The Covid-19 pandemic brought about many changes in peoples’ lives and habits. One of the positive changes was families had a whole lot more quality time together. Additionally, a whole lot more baking was going on and the evidence was obvious at the supermarket. Although improving, for months it was nearly impossible to get your hands on any yeast or flour.
Sourdough definitely solves the problem of the yeast. However, the flour was another issue, that had no solution other than diligence, and constant checking. Whether ordering online, shopping in person or having others check when they shopped, there were no easy solutions.
Admittedly, delving into the sourdough process was a rather intimidating venture. I read, I watched videos, I learned, and then I just jumped in. Reassuring, were the numerous promises, that “even if it doesn’t look good, it will still taste good”. And they were absolutely spot on, the first couple of loaves were delicious, although definitely not perfect. However, I was hooked!
First, the starter. Again, easier than you think. No worries here, you will have a tough time “ruining or killing” your starter. If you already have a starter, terrific, and if not, here is a link to managing and purchasing your sourdough starter. Alternatively, I have plenty and would be happy to share, (while it lasts) if you happen to be local.
INGREDIENTS 1/4 cup (50g) of active starter 1-1/3 cups, plus 2 Tbs. (350g) warm water 4 cups, plus 2 Tbs. (500g) bread flour or all-purpose 2 tsp. (14g) fine sea salt
DIRECTIONS First and foremost, I encourage you to use a kitchen scale; that is why I have included the weight measurements. That is the most accurate and believe me, it does make a big difference. If you don’t have a scale, go ahead and use the measurements given. However, if you are so inclined, buying a scale is very reasonable (here is one that I use). Honestly, it is infinitely easier than dirtying cups, bowls and measuring spoons.
Add the starter to a medium-sized bowl, then add a small amount of the water and whisk or stir to combine with the starter, until it looks like milk. This makes combining the two much easier than dumping all the water in at the same time and ending up with clumps, that take longer to smooth out. When fully incorporated, add the remainder of the water, stir to combine, then add the flour and sea salt. Combine until a stiff dough forms, then finish mixing by hand or with a pliable bench scraper, to fully incorporate the flour. The dough will feel dense and shaggy, and it will stick to your fingers as you go. Scrape off as much as you can. Cover with a “shower cap”, bowl cover or a damp towel and let rest for 30 minutes.
After the dough has rested, wet your fingers, grab a portion of the dough and fold it over, pressing your fingertips into the opposite edge. Repeat, working your way around the dough until it begins to tighten. Check out this video, it will show you how to do this. It is quite simple and takes about 20 seconds to complete.
Cover the bowl with a damp towel and let rise overnight at room temperature. This will take about 8 to 10 hours and is ready when it no longer looks dense and has roughly, doubled in size.
In the morning, place the dough on a lightly floured surface. To shape it into a round, start at the top and fold the dough under itself, toward the center. Turn the dough slightly and fold over the next section of dough. Repeat until you have come full circle. Check out this video to help you visualize the process. Flip the dough over and let rest for 5 to 10 minutes. Meanwhile, line an 8″ or 9″ bowl with a towel and generously dust with flour. With floured hands, gently cup the dough and pull it toward you in a circular motion to tighten its shape. Then, place the dough into the bowl, seam side up. Again, cover the bowl and let it rest for 30 minutes to 1 hour.
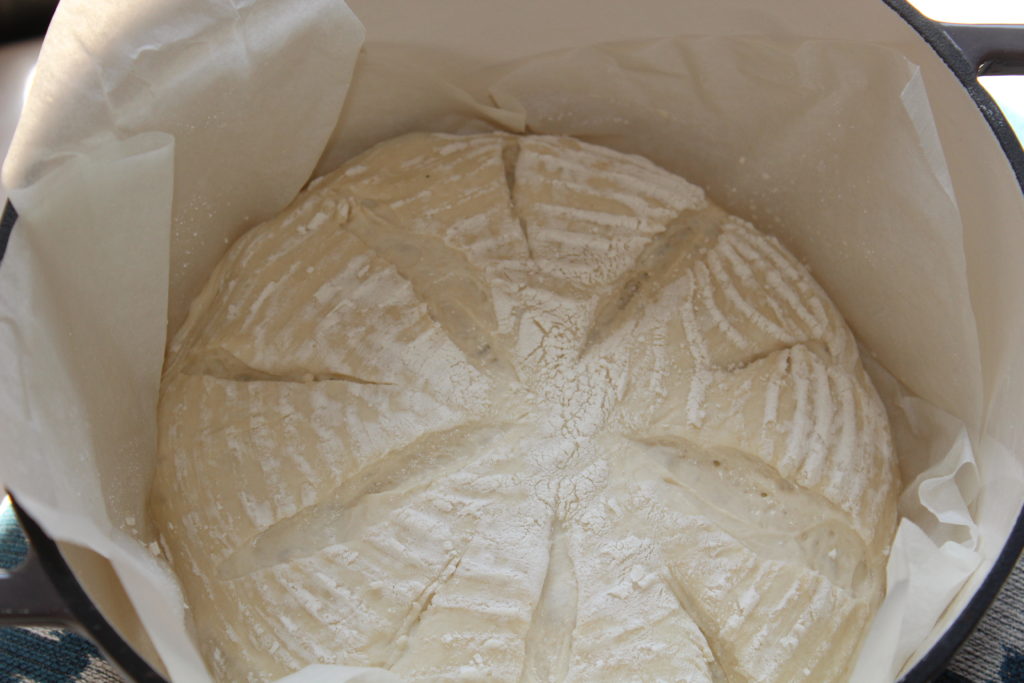
Meanwhile, preheat your oven to 500°F and move the rack to the lower third of the oven. The dough is ready when it looks puffy and has risen slightly. Take a sheet of parchment paper, cover the bowl and invert the bowl to release the dough. Using a very sharp knife or a bread lame, score the top in a cross-cut pattern or star pattern (see below), and transfer the dough to the dutch oven.
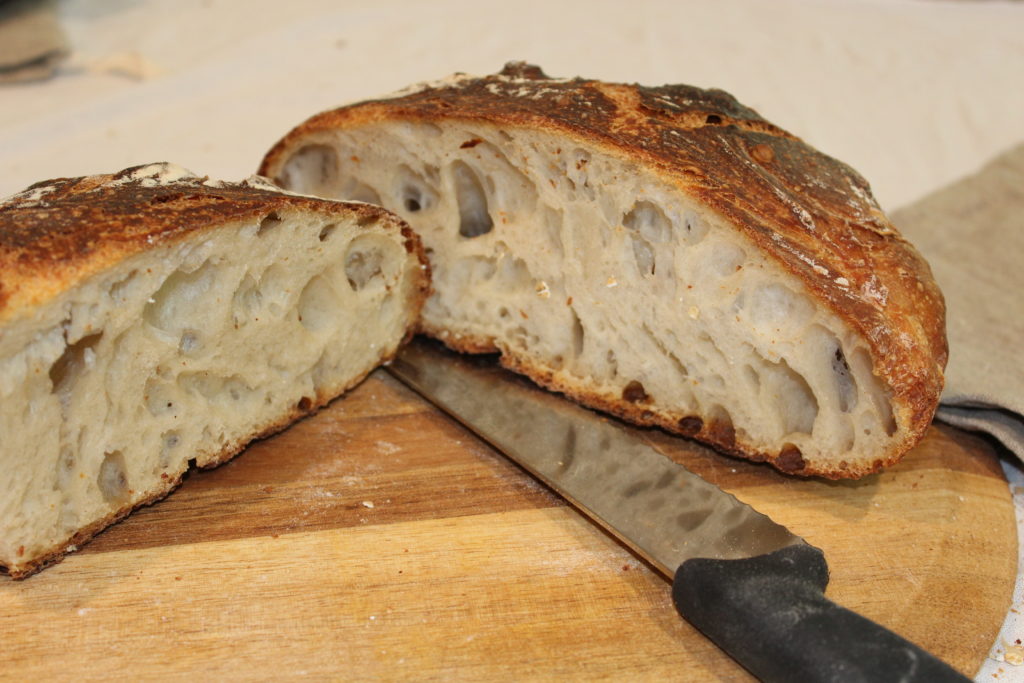
Bake the dough, covered, for twenty minutes. After twenty minutes, remove the cover, and continue to cook for 30 minutes more. If you prefer a darker crust, remove the loaf from the pot and place directly on the oven rack for an additional 5-8 minutes. Cool for a solid hour before cutting. This allows the inside to finish cooking; if cut too soon, the inside could be a bit underdone and gummy. Trust me, it is worth the wait!
Banana Bread
So, given that we have all been locked inside for way too many weeks, I assume I’m not the only one that has been baking bread…all kinds of bread. This is an easy recipe to pump out and please the family. They’ll love you for it and it is wonderful any time of day. Additionally, if you really want to make them happy, try my honey oatmeal bread, it’s an insanely easy and delicious sandwich bread.
Sourdough has been my other ‘project’ recently; very intimidating at first, but not as difficult as I thought it would be. It is incredibly gratifying when you pull that first loaf out of the oven and realize that YOU made it. More to come on that in a later post and I hope you try it.
Yes, I know what you’re thinking, this is an extremely dangerous obsession and sadly, you are correct and I have the pounds to prove it. However, it is a also a delicious and satisfying endeavor and the good news is, my consumption has tapered off dramatically (and yours will too), moderation is definitely the key.
Back to the banana bread; this is an adaption from Smitten Kitchen’s Ultimate Banana Bread and is a true banana lovers’ bread. In case you haven’t noticed, many recipes have only a mild banana flavor and I think it’s because they tend to skimp on the bananas. Personally, I like a strong banana flavor and this recipe fits the bill, with a hefty 4-5 bananas.
INGREDIENTS 1/2 cup butter (1 stick), cut into chunks 1 cup packed, light brown sugar 4-5 large bananas, mashed to equal about 2 cups 2 large eggs 1 tsp. vanilla extract 2 cups all-purpose flour 1 tsp. fine sea salt 1 generous tsp. ground cinnamon pinch of fresh grated nutmeg 1 tsp. baking soda 1 tsp. baking powder raw or turbinado sugar (optional)
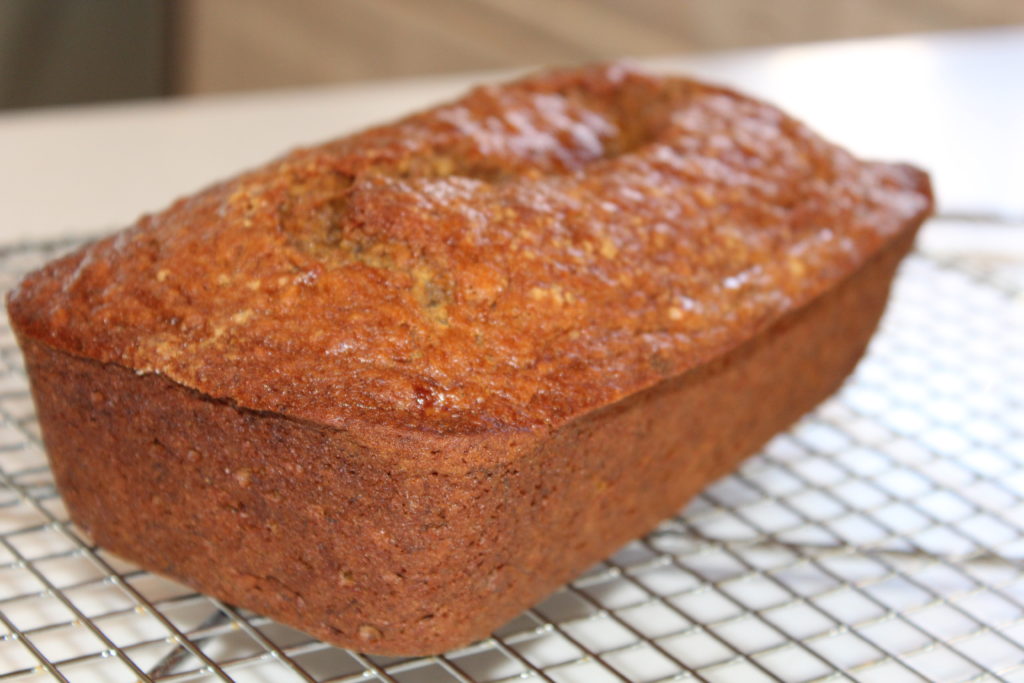
DIRECTIONS Preheat oven to 350º and butter a 9×5 inch loaf pan or coat with a nonstick spray and set aside.
In a large bowl, melt the butter, whisk in the brown sugar and then fold in the mashed bananas. Next, whisk in the eggs and vanilla. Meanwhile, combine the flour, salt, cinnamon, nutmeg, baking soda, baking powder and whisk to combine. Then, add the dry ingredients to the wet ingredients and stir well. When fully combined, pour into the prepared pan, sprinkle the sugar on top (about 1 Tbs., if using) and bake for 50-65 minutes. Use the toothpick test, when it comes out clean, its done. All ovens are different and can make a big difference when baking; so, be sure to use the toothpick as your guide.
Let it cool for as long as you can stand it and then, dig in…warm out of the oven, with butter; toasted the morning after, or as a mid-day treat with a cup of coffee or tea. Trust me, you’ll be back for more.
NOTES There are many ways to vary this. Obviously, the most common addition is a cup of walnuts. Think about trying a cup of pecans or a cup of mini chocolate chips is also a nice change and better than you might think. Give it a try.
Sweet Potato Oven Fries
Looking for a quick, healthy side dish? This just might do the trick. I love the simplicity of this, the preparation is about as minimal as could be and the tasty reward is significant. Try this as a yummy side with any grilled meat or poultry. However, my favorite is alongside a nice juicy grilled steak.
INGREDIENTS 2-3 sweet potatoes olive oil kosher salt fresh ground black pepper cayenne pepper, to taste 1-2 Tbs. pure maple syrup
DIRECTIONS Preheat oven to 425º First, wash and scrub the potatoes. Next, cut the potatoes in half, lengthwise and then cut each half into three or four lengthwise wedges. Place the wedges on a rimmed baking sheet, sprinkle lightly with the olive oil. Then add the salt, black pepper, cayenne pepper, maple syrup and toss to coat thoroughly.
Place into the preheated oven and roast for about 20-30 minutes, turning once or twice to ensure even browning. Because all ovens are different, check for doneness with a fork, it should be easily inserted. If it feels too firm, leave them in a bit longer. That’s it…serve immediately.
NOTES Although this is my favorite, feel free to be more adventurous and use different spices or fresh herbs. You could replace the maple syrup with a tablespoon or two of brown sugar. I have tried this with both fresh rosemary and fresh thyme and loved it.
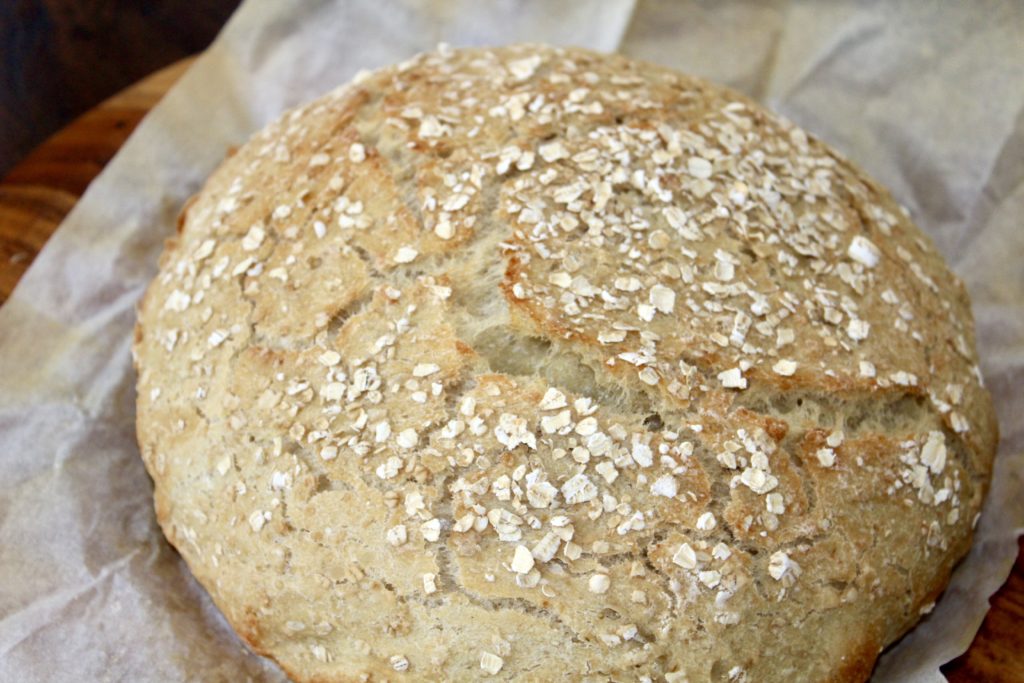
Easiest Ever Honey Oatmeal Bread
Okay, this is for all of you non-bread bakers. I understand your hesitation because that was me too, until I found this recipe. It is part of the no-knead trend in bread baking and it is a definite game changer. Not only is it easy, but it is delicious. Give it a try, you won’t be disappointed and I dare say, you’ll be quite pleased with yourself!
INGREDIENTS 16 oz. warm water 1/4 tsp. yeast 1 1/2 tsp. fine sea salt 1 1/2 Tbs. honey 3 1/2 cups all-purpose flour 1 cup oats, plus 3 Tbs. for garnish
DIRECTIONS First pour the water into a large mixing bowl. Next, sprinkle the yeast (this prevents clumping) into the warm water. Then, add the salt and honey; stir to combine, because the honey will just sink to the bottom otherwise. Next, add the flour and then the oats. Using the handle end of a silicone spoon; you can use a wooden one as well, it just sticks more, stir to combine the ingredients. This will be a very sticky dough and seem hard to combine, just keep going until it feels like a dense, scraggy mass. Then, cover with a dampened dish towel and set aside to proof, for about two to three hours or until roughly, doubled in size. Ideally, you would proof it overnight, but you still will get a good rise with the 2-3 hours.
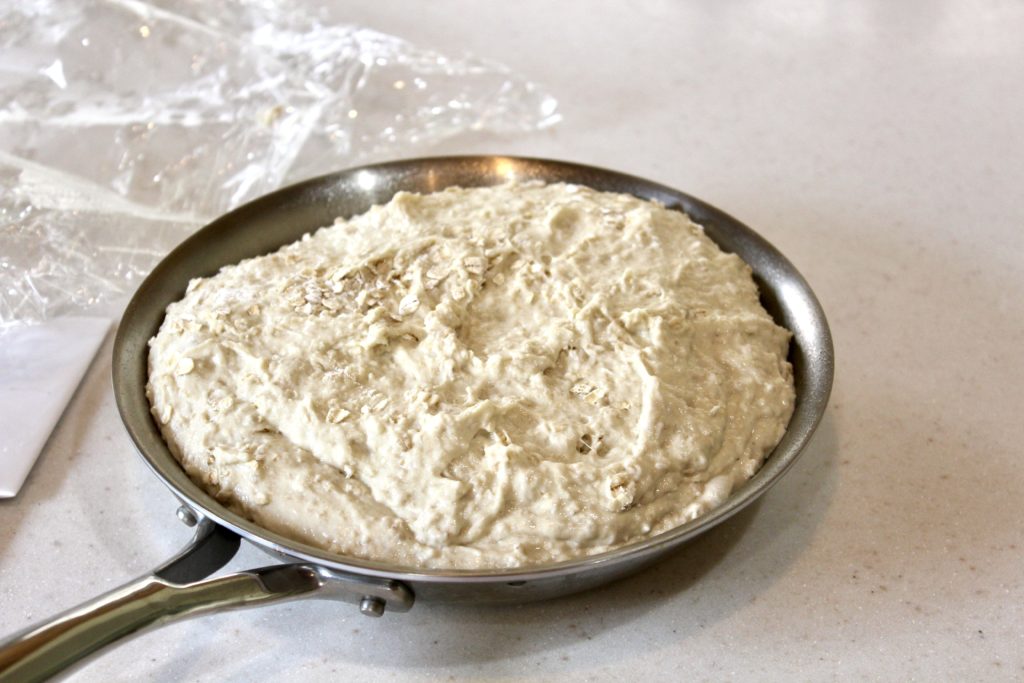
Once the dough has doubled, use the handle end of your spoon and mix the dough around. This will deflate it a bit and it should roll somewhat into a ball. (Sorry I don’t have a picture of this technique, but check out this video to see it in action.) Sprinkle 2-3 Tbs. of the oats on top and roll it around again. The goal here is to lightly coat the ball of dough with the oats, no hands need to touch the dough.
Next, use an 8″ non-stick frying pan as your proofing bowl. It should be smaller than the dutch oven that you will cook the bread in. Spray the pan with non-stick spray to ensure nothing sticks. Turn the dough into the pan and let sit or proof, for 30-60 minutes. Meanwhile, place your oven rack in the bottom third of the oven, place your covered dutch oven into the oven and preheat to 450º. A dutch oven isn’t essential, but definitely preferred. Alternatively, you could use an oven-safe, covered baking dish, with varied results.
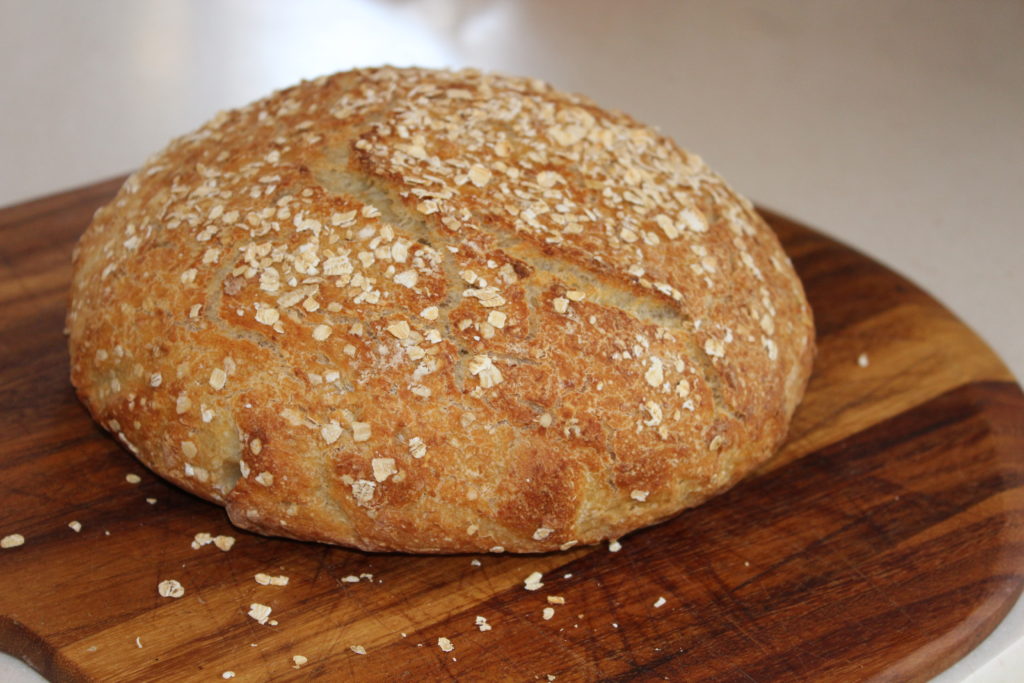
When the dough has finished proofing and the oven is properly preheated, remove the dutch oven. Next, remove the lid and flip the dough into your hot dutch oven, sprinkle the top with a few more oats (this is really just cosmetic). Then, bake in the oven for 30 minutes, with the cover on and another 3-10 minutes with the cover off.
after 30 minutes
additional 3 minutes
additional 6 minutes
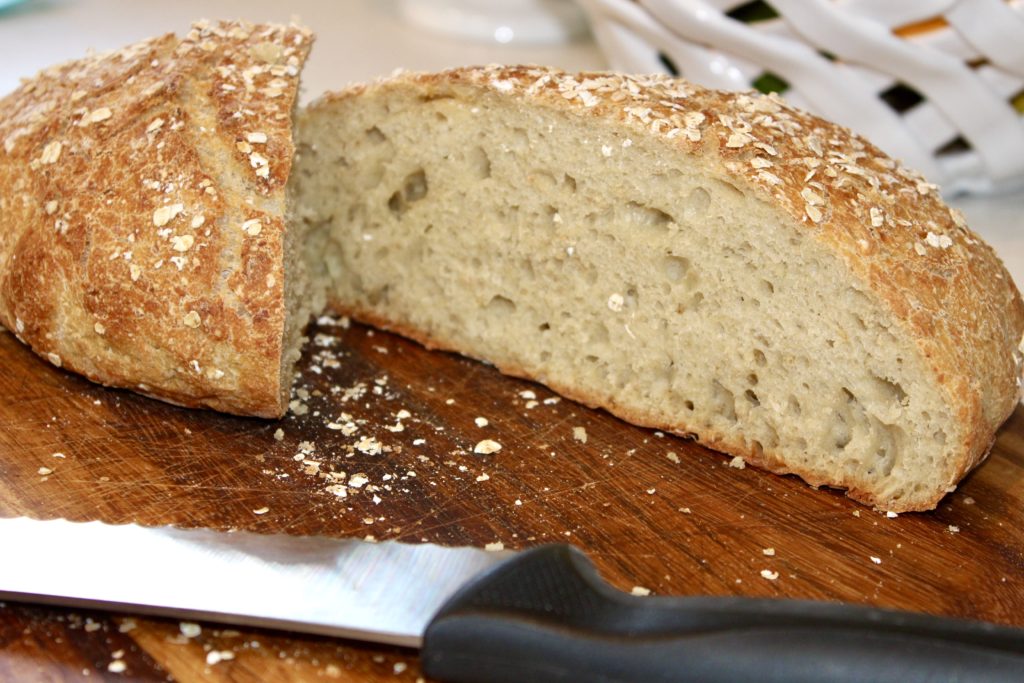
The timing of the final bake without the cover is to brown the crust to your liking and all ovens are different. I prefer a browner crust, so I usually do 5-6 minutes. Just make sure you watch those last few minutes carefully, because it does darken pretty quickly. Finally, remove from the oven and place the bread on a wire rack to cool, for about an hour…if you can wait that long! There actually is a legitimate reason for letting it cool a bit. If you cut into it too soon, you may find the inside a bit gummy. By letting it cool completely, or nearly so, you allow the inside to fully firm up.
NOTES I adapted this from a recipe I found on youtube. I will attach the link below, it is well worth watching. He does a great job of explaining and demystifying the process. Steve’s Honey Oatmeal video
Another tidbit, I often use a cup of whole wheat flour, instead of 100 percent all-purpose. So, the breakdown would be 1 cup whole wheat and 2 1/2 cups of the all-purpose. That’s just my preference, I feel it’s a bit healthier. Either way, it comes out irresistibly delicious.