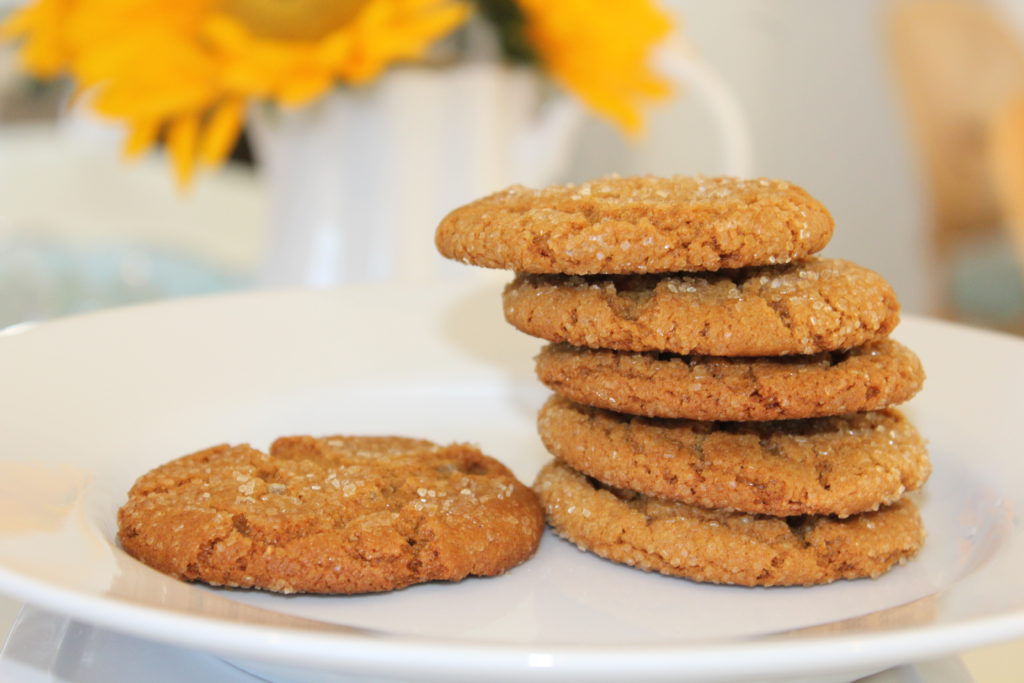
Ginger Molasses Cookies

This is the quintessential cookie that signifies fall is in full swing and the holidays are soon to follow. One of my all-time favorites, tough to stop at one and it just makes a cup of coffee taste that much better. Easy, reliable, and oh so satisfying.

INGREDIENTS
3/4 cup shortening, I use Crisco
1 cup sugar
1 egg
1/4 cup molasses
2 cups flour
1 tsp. each cinnamon, ginger, ground cloves
2 tsp. baking soda
turbinado raw cane sugar, for rolling

DIRECTIONS
Preheat oven 375º
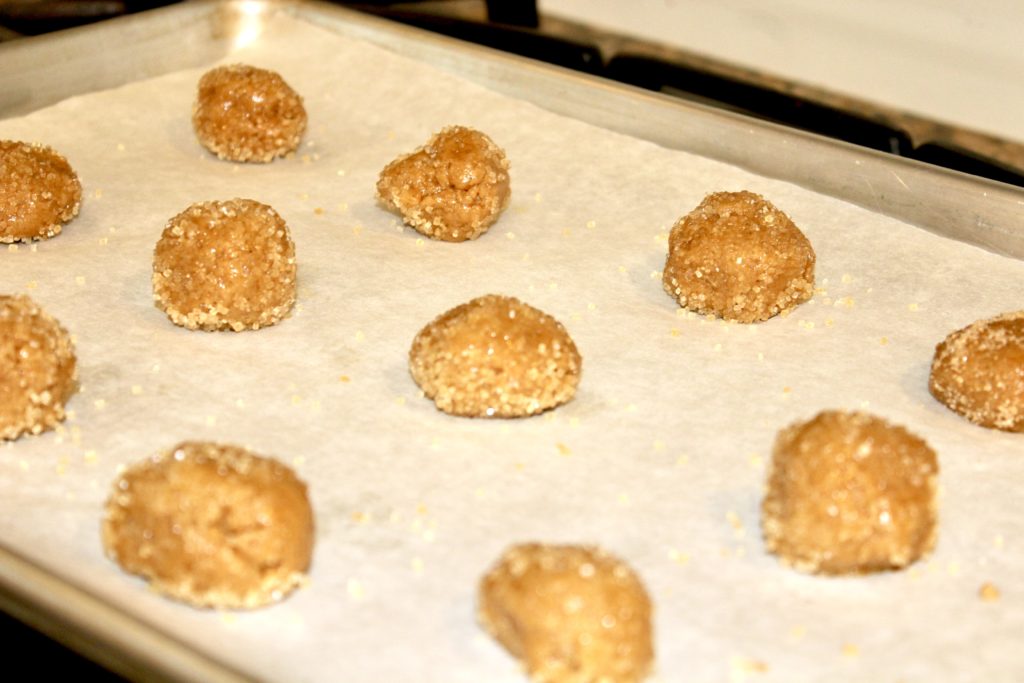
First, cream the shortening, sugar, egg, and molasses, until well combined and fluffy. Meanwhile, combine the dry ingredients and whisk them together. Next, add the dry ingredients to the sugar mixture and fully incorporate. Finally, take a small scoop of dough and roll into a ball, then dip and roll in the turbinado sugar to fully coat. Bake on an ungreased cookie sheet for about 10 minutes. Do keep a close eye on them, all ovens are different and that could affect the timing on these.

oven-ready

NOTES
If you don’t have turbinado sugar, not to worry, you could use regular sugar with similar results. The turbinado sugar just adds a little extra crunch that is a nice addition. Also, to add a bit more zip in the cookies, I often chop a bit of crystallized ginger and add it to the batter. Undoubtedly, whenever I do, I get rave reviews.

TIPS
Although many of you may already do this, I want to share this secret anyway. For all of you that have not tried this, I think it is a definite game-changer. This little trick comes in very handy when I’m baking with the little ones and I don’t want three dozen cookies in the house because, truth be told, I can’t stop eating them!

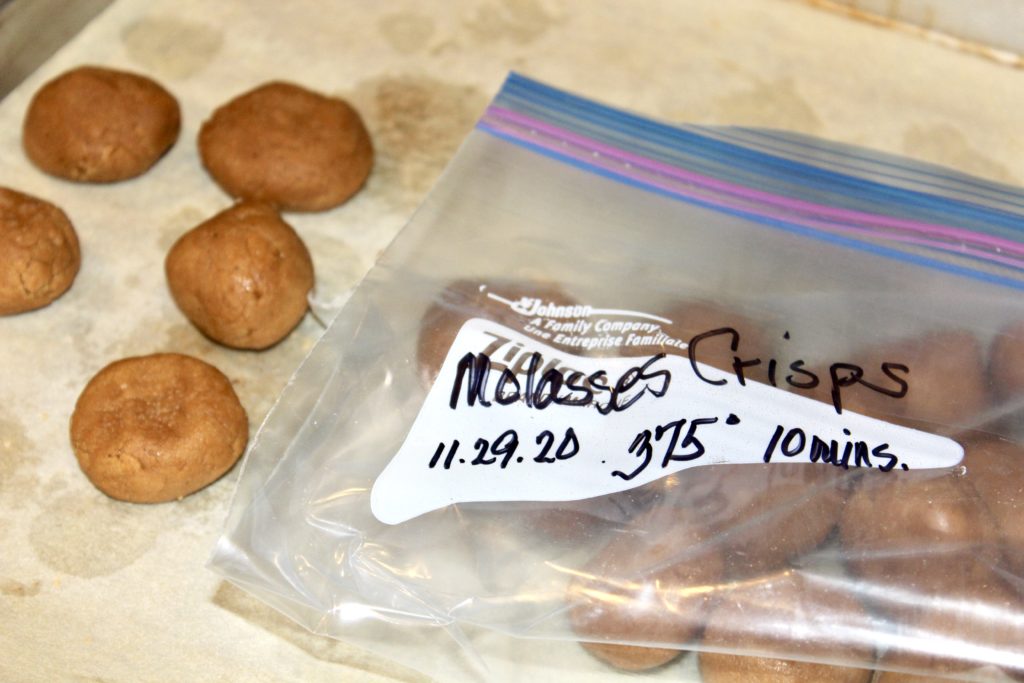
So, here it is. I make the cookie batter, cook what I want…maybe just one sheet pan full, for a small get together or just enough for me and my helpers. Then, I scoop the remainder of the dough, make dough balls and place them onto a sheet pan. Put as many on the pan as you can fit, then pop them into the freezer.

Then, after about 30 minutes in the freezer, pull them out, remove from the sheet pan and place them in a reclosable plastic bag. Make sure to mark the cookie name, cooking instructions, and the date. That way, you can pull them out, at a moment’s notice, you don’t even need to thaw them first and bake however many you want. I do this with all of my cookie batters, it’s a great way to keep us from eating two dozen in short order! Additionally, it is nice to have a selection of two or three to pick from at any given time.


Macaroni and Cheese

Well, the temperature is dropping, the world is imploding and I don’t know about you, but I want some mac and cheese. Make that bacon mac and cheese! This is serious comfort food and I promise, it won’t disappoint. Now, it definitely won’t fix this crazy world, but it will make you feel just a little bit better.

INGREDIENTS
2 oz. smoked bacon
8 Tbs. butter, separated
6 Tbs. flour
2 tsp. kosher salt
1 tsp. fresh ground pepper
1 tsp. dry mustard
1/2 tsp. nutmeg
4 cups milk, warmed
7 oz. gruyere cheese, shredded
7 oz. sharp cheddar cheese, shredded
4 oz. fontina cheese, shredded
1 lb. macaroni of choice (I prefer cavatappi)
2-3 small tomatoes, sliced
1 cup panko crumbs
small handful of fresh parsley, finely chopped

DIRECTIONS
First, let me say that the cheese amounts and kinds of cheese are definitely flexible. Use what you have on hand. If you have more of one cheese than another, use it and don’t fuss over it. Everything will be fine and more importantly, it will be delicious. Additionally, the bacon is optional, however, if you do use it, I highly recommend a thick-cut. If using the thick-cut, you would use 2 slices.

Now, time to make the white sauce. Start by cooking the bacon, until crisp, then remove to a plate with paper towels, to drain. Set the bacon aside and once cooled, chop or crumble. If there is an abundance of bacon fat, do pour that off, you only need a small coating left in the pan. Then, using that same pan, over medium heat, melt 6 tablespoons of the butter and add the flour. Continuously stir for two to three minutes or until the flour turns a light golden brown. Then, add the salt, pepper, mustard, and nutmeg, continue stirring and cook for another minute.

Next, slowly add the warmed milk, while constantly whisking to prevent lumps from forming. Slow and steady is the way to go with this sauce. It doesn’t take long, but it does need attention, constant stirring for a few minutes to let the milk be incorporated and warm the mixture enough to start thickening. Then, add the cheese and do the same for a few minutes to allow the cheese to melt. It doesn’t need to fully melt, it will finish in the oven. Meanwhile, cook the pasta according to the directions, however just slightly undercook it. Have no fear, it will finish cooking in the oven.

Drain the pasta, add it to the sauce and add the bacon as well. Stir to combine well and then pour into a large, ovenproof casserole dish. Now, melt the last two tablespoons of butter, add to the panko crumbs, along with the parsley, a hefty pinch kosher salt, some fresh ground pepper and stir to fully combine. Then, slice the tomatoes and place them in an overlapping row down the middle of the casserole. Finally, sprinkle the crumb mixture over the tomatoes and macaroni. Bake in the oven for about 35-40 minutes or until bubbly and the crumbs are golden brown.

NOTES
Alternatively, you could use individual gratin dishes instead of a large casserole, as in my picture above. This is a nice presentation, especially if you’re making it for company. Although the tomatoes are a yummy touch, omit them if you wish. Also, feel free to omit the bacon if it feels too rich. However, I do think you should try it with the bacon and the tomatoes at least once!


Roasted Delicata Squash

We all know that choosing vegetables can be a rather ho-hum and boring endeavor. So, if you’re feeling the need to shake up your vegetable selections, I have the perfect choice for you and it’s delicata squash. This is one of the easiest winter squashes to prepare and I have yet to have anyone not like it. Surprisingly, many people aren’t even familiar with this variety and I’m hoping to change that. The skin is thin, nutritious, adds a wonderful texture, and makes for super quick prep. Did I mention that it’s delicious, equally at home for a quick weeknight meal or for a fancier addition to a company meal? That all adds up to a definite win-win, in my book.

INGREDIENTS
1-2 delicata squashes
drizzle of olive oil
sprig or two of fresh rosemary and thyme
drizzle maple syrup, honey or hot honey (my favorite)
kosher salt
fresh ground pepper

DIRECTIONS
Preheat oven to 425º
First, I would give the squash a quick rinse, since you won’t be peeling it. The best preparation is also the easiest, the simplest and that is just plain, basic roasting, in a very hot oven, with very few embellishments.

After the quick wash, cut off each end and then cut the squash in half, lengthwise. Next, scoop out the seeds and then slice into 1/4″ -1/2″ half-moon slices. I prefer them closer to the 1/2″, the thicker slices are more substantial and are less likely to overcook. However, if you’re tight on time, the thinner slices will roast up much quicker. Just be sure to watch them closely, so they don’t overcook.

Then, place the squash on a rimmed baking sheet, drizzle with the olive oil, a small drizzle of the syrup or honey and sprinkle with kosher salt and fresh ground pepper. Place the herb sprigs on top, toss to coat well, and make sure they are in a single layer. Depending on how much you’re cooking, you might need two sheet pans. They need a little space to carmelize and crisp up, if they are too close together, they will just steam. Still tasty, but not as good.

Finally, roast for about 30 – 40 minutes, turning them halfway through the baking time; they should have some definite brown spots. The roasting time depends on how thick the slices are and on your oven, so always keep an eye on them towards the end of the estimated time. When done to your liking, transfer to a serving dish and sprinkle with a pinch of flaky sea salt and serve.

roasted delicata

NOTES
Although I really do prefer the more simple approach to highlight the squash’s flavor, you might want a bit more embellishment. Two of my favorite options are to add a sprinkle of cayenne pepper (unless I’m using the hot honey) or your favorite spice rub. The best hot honey I’ve had is Mike’s Hot Honey and a little goes a long way. So, try adding a very small amount to start. My only caution is, don’t go too crazy, remember, you want the squash to shine, but it really does add a nice kick of flavor.

By the way that hot honey is an incredible addition to so many dishes. Once you have it, you will find yourself reaching for it constantly.


Foolproof Apple Tarts

Fall is my favorite season, here in New England, and beautiful days, cooler nights are a sure sign that fall has arrived. This is about the time I shift to more cozy, heartwarming comfort foods. And, it wouldn’t be fall without apples on the menu. Although I have a soft spot for apple pie and who doesn’t? I love the simplicity and no-fail aspect of these tarts. They are a wonderfully satisfying dessert that requires very little time and effort. That’s a definite win, win for me.

INGREDIENTS
1 package frozen puff pastry (I use Pepperidge Farm)
4 Granny Smith apples
1/4 to 1/3 cup sugar
4 tablespoons (1/2 stick) cold unsalted butter, diced
1/4 cup apricot jelly or jam
1 Tbs. water or Calvados, if you have it

DIRECTIONS
Preheat oven to 400º.
First, thaw the puff pastry, unfold and then place each sheet on a parchment-lined sheet pan. Then, cut each of the two sheets, into four squares.

Next, peel and core the apples, cut them in half through the cut-away, core area, and slice them crosswise into ¼-inch slices. Then, place overlapping slices of apples diagonally down the middle of the tart and fill in with smaller pieces on the sides, until the pastry is covered. Finally, sprinkle with the sugar and dot with the butter.

Bake for 40 to 45 minutes. You will know they’re done when the pastry is browned and the apple edges are lightly browned. Rotate the pan once during cooking. Don’t panic when the apple juices burn in the pan (they always do), the tart will be fine!

Meanwhile, combine the apricot jelly and water in a small microwaveable bowl and heat until bubbly. Then, brush the apples and the pastry completely with the jelly mixture. Loosen the tarts with a metal spatula so they don’t stick to the parchment and allow to cool. Serve warm or at room temperature.

NOTES
A nice addition to these would be toasted, slivered almonds sprinkled on top. Another would be adding a pinch of cinnamon to the sugar, before sprinkling on top. Additionally, you might want a scoop of vanilla ice cream when serving them hot from the oven!


Roasted Acorn Squash

With heartwarming flavor and ease in preparation, acorn squash is a great fall favorite. Maybe part of the draw in becoming a fall favorite, is the fact that there is no peeling required and therefore, this makes it a terrific choice for a quick, weeknight veggie.

Besides acorn and delicata, you can use any type of winter squash in this recipe. However, while the flavors are all wonderful, remember that the other squashes will need peeling and therefore will take a bit more prep  time.

INGREDIENTS
1 acorn squash, seeded and sliced (no need to peel it)
1-2 Tbs. olive oil
1 Tbs. maple syrup (the real stuff please…it does make a difference!)
several sprigs of fresh thyme, save a little for garnish
kosher salt & fresh ground pepper, to taste

DIRECTIONS
Preheat oven to 400°
Besides being delicious,  winter squashes can be tricky (and dangerous!) to cut. Using a good, sharp knife, cut the squash in half and scoop out the seeds. Then, put the flat side down on the cutting surface, slice the squash into about 1/2″ pieces. Drizzle with the olive oil, maple syrup, sprinkle the thyme sprigs, salt and pepper. Finally, toss to coat and spread out in an even layer. Make sure there is room between the pieces, because you want them to roast and not steam.

Roast in the oven for about 20-40 minutes (depending on the size of your chunks), checking frequently and yes, do flip to ensure even browning. Check for doneness by pricking the squash with a fork or small knife and if it’s tender and falls off easily, then it’s ready.

Serve with the remaining sprigs of thyme as a garnish. In addition to the thyme, I often use rosemary as well and I’m never disappointed. It just adds another depth of flavor.

Additionally, if you like fall vegetables, you might want to try Roasted Root Vegetables.