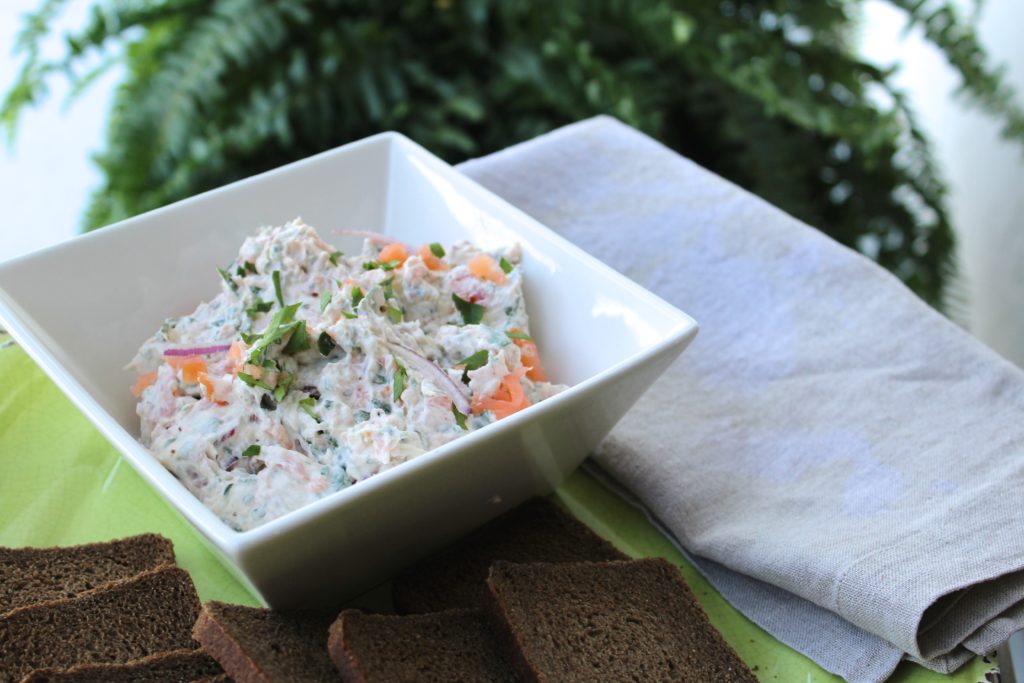
Salmon Cucumber Cups

If you’re looking for a healthy, tasty and easy appetizer, this should be your new go to recipe. This comes together in minutes and can be served as an actual spread with crackers or as a dip. However, if you’re feeling “fancy” and looking to impress a bit, you could use it in cucumber cups, as shown in the photo above. They make a great presentation, they’re an easy, no mess, finger food and are definitely a healthy, low carb option.

INGREDIENTS
1/4 – 1/2 lb. smoked salmon, chopped
2 Tbs. grated onion or finely chopped
1 1/2 Tbs. fresh dill, chopped
2 Tbs. sour cream
1 Tbs. plain greek yogurt
1 Tbs. capers
2 tsp. fresh lemon juice
fresh ground pepper, to taste

DIRECTIONS
Combine all ingredients, mix well and serve with pumpernickel squares, crackers or some nice crunchy crostini.

CUCUMBER CUPS
1-2 English cucumbers
Cut the cucumber into 1″ pieces, then, using a melon baller (a 1/2 teaspoon measuring spoon works well too) , scoop out the center of the cucumber to form a ‘cup’ for the salmon. Lightly salt the cucumber cups and turn upside down on a paper towel for 10-15 minutes. Finally, when fully drained, fill the ‘cups’ with the salmon spread, arrange on your platter and serve with a little garnish of dill fronds.

salmon spread


Roasted Tri-Colored Baby Carrots

Whether for your family or for company, this is a terrific choice for a simple and very tasty vegetable. I love the way these carrots look, they couldn’t be easier to prepare. Therefore, I predict that they will quickly become a definite go to, no-fail, staple in your rotation.

INGREDIENTS
1 lb. bag of tricolor carrots, Trader Joe’s is a good source
olive oil
1 Tbs. real maple syrup
fresh thyme sprigs
kosher salt
fresh ground pepper

DIRECTIONS
Preheat oven to 400º
First, peel and trim the carrots. However, if you are lucky enough to find the ones with the green ends on, don’t cut them off. Those ends add some nice visual interest and texture to the dish. Then, place the carrots on a sheet pan, drizzle with the olive oil and the maple syrup. Add the salt, pepper, fresh thyme sprigs and toss all together to fully coat the carrots.

Spread the carrots out to ensure that they have room to roast properly, rather than just steam.

roasted carrots

Then, bake for about 30 minutes or until mostly tender and slightly browned. This may be done ahead of serving time. Finally, when ready to finish and serve, transfer the carrots to an oven proof serving dish. Then,  return them to the oven for an additional 8- 12 minutes, until fully tender and hot. Lastly, remove them from the oven, sprinkle with some flaky salt and serve.


Easiest Chicken Soup Ever

Remember Gourmet magazine? Well, this is adapted from one of their recipes, way back in 1999! Even after all these years, this is still a favorite in my house.

It is hearty, delicious and pretty darn simple to make. Everything goes into the pot, with only minor chopping and you walk away, for an hour. The brown rice is essential here because its heavy, starchy texture holds up to the hourlong cooking and breaks down a bit to produce a pleasing texture, that adds great body to the soup.  Additionally, it doesn’t hurt that the brown rice also has better nutritional value than white rice. Although you  might be tempted to use white rice, know that the white rice would break down and become too mushy; not the greatest texture.

Since the bulk of the “work” is deboning the chicken, you could make this even easier by just using chicken breasts. However, I think, if you have the time/patience, the whole chicken imparts much more flavor.

INGREDIENTS
1 large onion, roughly chopped
4 large celery sticks, cut into 1/4″ slices
3-4 medium carrots, cut into 1/4″ slices
1 whole chicken, 3 1/2 -4 lbs.
1 cup long grain brown rice
1/3 to 1/2 cup flat leaf parsley, roughly chopped
1 Tbs. kosher salt
fresh ground pepper, to taste
3-4 quarts of water

DIRECTIONS
First, combine all ingredients in a 6 quart pot. Then, add the water to the pot, bring to a boil. Occasionally skim off any fat or scum, as  it comes to the top. Then, reduce the heat, cover and simmer for an hour.

Remove the chicken from the pot. When it’s cool enough to handle, remove the meat, discard the skin and bones. Then, shred the chicken with two forks and return it to the soup. I think the shredding gives the soup a more pleasing texture than just solid chunks of chicken.

Then, check for seasoning, add more salt and pepper, if needed, add a sprinkling of chopped flat-leaf parsley and serve. This makes quite a bit of soup and worth noting then, that it’s great to stock the freezer with.  It then comes in handy when you need a quick lunch, have a sick day or just on a cold day, when a warm bowl of soup soothes the soul.


Celery Soup

Please wipe away any comparisons to that well known canned soup from our childhood days, this could not be more different. Celeriac (also known as celery root) and fresh celery infuse this soup with a very intense and soothing flavor.

Although served hot, I find it delicious cold as well, which makes it a great choice for lunch on a hot summer day. Also noteworthy, this is about as low calorie as you can get, with fewer than 50 calories per serving,  yet it is delicious and satisfying, now that is a great combination!

INGREDIENTS
1 large leek, cleaned and roughly chopped
6 celery ribs, preferably with some leafy tops attached, roughly chopped
1 small celery root, (about 1/2 lb.), peeled and diced
4-5 cups chicken stock
fresh ground pepper
1/4 cup chives, chopped

DIRECTIONS
Combine the first four ingredients in a heavy 4 qt. saucepan over medium-high heat. When the mixture comes to a boil, reduce the heat to medium-low. Then, partially cover and simmer until the celery root is completely tender and breaks apart easily. This should take 20-30 minutes, depending on the size of your celery root dice.

Transfer the soup to a food processor, blender or use an immersion blender and process until totally smooth. Personally, I use a NutriBullet and find that it does the best job. It totally breaks down the fibers and emulsifies into a beautiful, thick soup. It does such a good job, that it is hard to believe there is no cream or potatoes for thickening.

Celery is very stringy, so regardless of what device you use, err on the side of more blending to ensure that you have broken down any and all stringy pieces. Return to the saucepan, check for seasonings, reheat and garnish with the chives.

NOTES
I do not add any salt since the celery itself is naturally salty. You may add if you like, but I have found even a small amount of added salt was too much, so just be cautious with it.

Whether you prefer it hot or cold, try it as a worthy alternative for chicken soup when you aren’t feeling well.


Sautéed Cherry Tomatoes

Have an overabundance of cherry tomatoes and need a quick, tasty vegetable? Then you will love this recipe. I hope it will become a staple in your “get it on the table quickly” lineup. Even if some of your tomatoes have started to shrivel, don’t despair, they will still taste delicious! Although it is a quick weeknight veggie, it is also a great choice for company meals and goes well with almost any meat or fish dish.

INGREDIENTS
assortment of heirloom cherries or what you have on hand (half them if they are on the large size)
small drizzle of extra virgin olive oil
kosher salt
fresh ground pepper
fresh flat leaf parsley, chopped
fresh basil, julienned

DIRECTIONS
Preheat skillet on medium heat, add the oil, tomatoes, salt and pepper. Sauté for 2-3 minutes or until tomatoes are blistered. Then, take off the heat and add the herbs, toss to coat, check for seasonings and serve.

That’s it…easy, tasty and healthy. Give it a try and let me know how you like it.

VARIATIONS
Although I prefer the simplicity of the recipe as is, you could certainly add some extras if you wish. Some of the add-ins that I have tried are toasted pine nuts, sliced shallots, a minced garlic clove and/or crumbled cheese. All with great results. However, you don’t have to stop there, get creative and let me know your favorites.


Sautéed Salmon with Leeks and Tomatoes

Lately I have been trying to focus a bit more on healthy meals. Ironically, in the mail last week, was a recipe from a very good friend, who also happens to be an incredibly good cook. She sent me this to try and promised it was not only delicious, but a snap to make and of course quite healthy.

Now, it’s not that I don’t trust her, but I have not been the biggest fan of salmon. Although I do try to have it occasionally because I know it is so good for you. So for you Marty, I made it tonight and you were spot on, I loved it and I highly recommend it. Sometimes you just have to go on good faith and trust that good friends won’t disappoint!

PS, a little update since I first posted it back in 2018, this has definitely become one of my all-time favorite quick, healthy meals.

INGREDIENTS
4 boneless salmon fillets
kosher salt & fresh ground pepper, to taste
1 leek, well trimmed, white part only
1 pint cherry tomatoes
3 Tbs. olive oil
2 Tbs. lemon juice
2-3 Tbs. julienned fresh basil or flat leaf parsley

DIRECTIONS
The salmon should be at room temperature, check for bones (remove with tweezers if you find any) and sprinkle with salt and pepper. After trimming the leek, slice down the middle, submerge in a bowl of water and swish around to rinse away any sand particles. Then, remove from water, pat dry with a towel, slice into thin strips and finely chop. You should have at least 1/3 cup. Slice the cherry tomatoes in half. I prefer to slice them on the diagonal, no particular reason, other than I think they look better on the diagonal.

leeks and tomatoes

Heat 2 Tbs. of the oil in a nonstick skillet over moderate heat and add the salmon, skin side up. Cook for 2-3 minutes before turning. Cook on the second side for 2-3 more minutes (depending on how well done you prefer) and then transfer to a warm platter. Add the remaining oil to the skillet, then add the tomatoes, leeks, salt, pepper and lemon juice. Cook for 2-3 minutes, pour the mixture over the salmon, sprinkle with the basil and serve.

This is so quick, easy and tasty. Please give it a try and let me know how you like it.


Grilled Cilantro Lime Shrimp

A delicious, easy recipe that is a nice alternative to the usual shrimp cocktail and very quick to pull together.

INGREDIENTS
2-3 cloves garlic, minced
scant 1/4 cup extra virgin olive oil
1 tsp. kosher salt
1 tsp. ground cumin
1/4 cup cilantro, chopped
3-4 limes, thinly sliced, one lime cut into wedges
1 lb. extra large shrimp, I used 21-30 per lb.
bamboo skewers, soaked in water for 30 minutes

DIRECTIONS
Preheat grill to medium-high.
In a bowl large enough to hold all the shrimp, combine garlic, olive oil, salt, cumin and half of the chopped cilantro. After combining ingredients, add the shrimp and toss to coat completely. With the skewers, start and end with shrimp, alternating a folded lime slice between each shrimp. (For ease of turning, you could use two parallel skewers.)

Grill the the shrimp until opaque, about 1-2 minutes per side, depending on how hot your grill is. Just before serving, top with remaining cilantro and fresh squeezed lime juice.


Granola

I have tried many granola recipes and have combined several here, to bring the best of each, with a good balance of healthy and tasty. Many granola recipes are delicious, but more like candy, this is my attempt to move toward a healthier version and still be delicious  Let me know how you like it.

INGREDIENTS
4 cups whole oats, Bob’s Red Mill is a good one
1 cup ground flaxseed
1 cup unsweetened coconut flakes, again, Bob’s Red Mill is good
1 cup chopped nuts, I like toasted slivered almonds
1 cup dried cranberries, raisins or cherries (my preference)
1 cup sunflower seeds
1 Tbs. ground cinnamon
1/2 tsp. kosher salt
6 Tbs. (77g) canola oil
6 Tbs. (120g) honey
1 Tbs. pure vanilla extract
1 cup dried cranberries, raisins or cherries (my preference)

DIRECTIONS
Preheat oven to 300º
Line two baking sheets with parchment. Toss together all of the dry ingredients, except the dried cranberries or cherries, in a very large bowl. The dried fruit will be added after baking the mixture and that way they stay soft. I found adding the dried fruit with the other ingredients and then baking just made the fruit too dried out and tough to chew. The texture is far better if you add them after the baking.

Combine the oil, honey, and vanilla in a saucepan and warm over low heat, stirring, just until the mixture is fluid. Do not boil or even simmer, just bring it to a cohesive liquid. Pour over dry ingredients and mix until well coated.

Line two sheet pans with parchment paper or a Silpat. Spread the granola mixture on the sheet pans in an even layer, leaving a donut hole in the center (see below), for even baking, and bake on the middle and lower racks, without stirring, for 30 to 40 minutes or until golden.

Rotate the baking sheets, front to back and top to bottom halfway through. Allow to cool completely before storing in airtight containers.

NOTES
A little update here. I changed the dried berries from being added to the whole mixture, to adding after the baking. This ensures that they stay softer and then are easier to chew. I found that they were often too hard to chew after they had been baked. The pictures above show that original version where I baked them.

I also have straight up, halved this recipe, with great success. If you have a full house, or you’re looking to share some with friends, the original version will be fine. However, if you have a smaller household, straight up halving each ingredient works equally well and still makes a good amount.


Simple Roasted Beets

So, I find that you either love beets or well, you really, really don’t. I am definitely in the love category. Beets are a wonderful fall vegetable and this recipe couldn’t be easier. An added bonus, any leftovers are a terrific excuse to make a tasty beet salad.

INGREDIENTS
1 bunch fresh beets, cleaned and quartered
olive oil
fresh sprigs rosemary & thyme
kosher salt
fresh ground pepper

DIRECTIONS
Preheat oven to 400º
Put beets on a parchment-lined sheet pan, drizzle with olive oil,  add herbs, sprinkle with salt and pepper, and toss to combine.

Put in preheated oven and cook for about 30- 40 minutes, depending on the accuracy of your oven. When done, beets should be easily pierced with a knife. Do make sure to monitor them because the cooking time varies significantly depending on individual ovens and on the size of your beets.

NOTE
Can be done earlier in the day, moved to an oven-proof serving dish, and just reheated before serving.

You may have noticed that I didn’t mention peeling the beets, that’s because you can go either way, regarding that. I very often, especially when using the traditional, dark beets, do not peel them. As long as you clean and scrub them, you really don’t need to. When doing rainbow colored beets, I mostly, but not always, do peel them, because they just look better. The choice is yours. Try it both ways, I don’t think you’ll notice a big difference, it definitely simplifies the preparation and it saves your hands from turning red. That’s a win-win.


Tomato, Basil and White Bean Salad

Super quick, incredibly tasty, versatile (use as an appetizer with crostini or a side dish) and eye catching as well. Definitely a winning combination, that never disappoints!

INGREDIENTS
1 can navy beans or other small beans, drained, rinsed
1/2 lb. plum or cherry tomatoes, cut into small dice
1/2 tsp. kosher salt
freshly ground pepper
1/4 cup extra virgin olive oil
2 small cloves garlic, minced
generous portion of basil, julienned

DIRECTIONS
First, combine the beans and the tomatoes in a bowl. Then, season them with kosher salt, fresh ground pepper and set aside.

Next, heat the oil in a skillet, over medium heat. Add the garlic and stir until fragrant, but not browned, for about 1-2 minutes. You are just looking to infuse the oil with the garlic flavor.

Pour the warm garlic oil over the bean, tomato mixture and let stand for about 30 minutes. This will allow the flavors to meld. Finally, add the basil, toss to combine and serve with homemade crostini or crackers and serve as an appetizer. However, this can be served as a yummy side dish. It pairs quite well with any grilled meat or poultry dish. In addition, this can be kept at room temperature for several hours.

At first glance, this seems too simple to be so good. However, trust me, this really is amazingly tasty and it will soon become a favorite.